
This post will help you out if: you use Skype to make video calls on your phone, PC or Tablet.
Video calls are a great way to keep in touch with people we care about as it means we can see them as we chat, almost as if they were in the same room with us. But some video call platforms also have the added benefit of subtitles (sometimes called captions) for those of us who struggle with hearing (which arguably makes them BETTER than in-person conversations, right? Maybe not…)
In this post, I’m going to focus on Skype, as it’s a really popular platform, and one that’s ahead of the game for subtitles. If you’re not familiar with Skype, I’ve put links to previous posts at the end of this one that’ll help you get started. In my instructions below, I’m assuming you’re already set up with Skype and have used it to make calls to people before. The instructions are the same whether you’re using Skype on a phone or computer, but the screenshots I’ve included are from my laptop (so don’t worry if yours looks a little different).
Switching on subtitles for all calls
- Open up Skype on your computer or phone

- Click or touch your profile picture or initials at the top of the screen to open up a menu, e.g. the RR in a circle shown here:

- In the menu that pops up, click or tap the ‘Settings’ cog

- Choose the ‘Calling’ option which has a symbol of a telephone handset

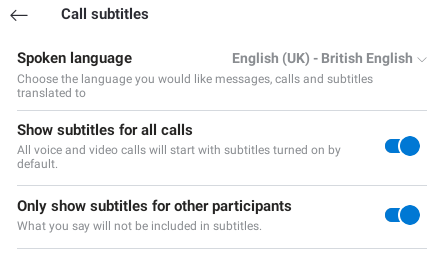
- Choose ‘Call subtitles’, then adjust the toggle switches. The top one lets you ‘show subtitles for all calls’ and the bottom one lets you choose whether you want to see what you are saying as subtitles too (off) or just the other person’s bit of the conversation (on)
Switching on/off subtitles during a call
For this bit I had to enlist the help of my good friend Mike so I can show you what happens during a call:

- In the bottom right of the screen, click or tap the three dots in a horizontal line
- This brings up a settings box (shown in the image above in the bottom right)
- The second toggle switch in the box lets you turn subtitles on or off during the call
You can see from the picture above that the subtitles aren’t exactly perfect. The first thing Mike said has come out really clearly, but there are a few errors in the second bit. If you let the person you’re speaking to know that you’re using subtitles then they can try and speak a little slower and more clearly to reduce the mistakes.
Unfortunately, the subtitles only appear live: if you record the call, the subtitles won’t show up on the recording.
(On some versions of Skype you can access more options in the settings box that will let you set yourself a snazzy background for the call, so no one can see that you haven’t done the washing up in the kitchen behind you. I’m mentioning this in case you’re wondering why Mike appears to be living inside a Microsoft Paint studio.)
What about other video call platforms?
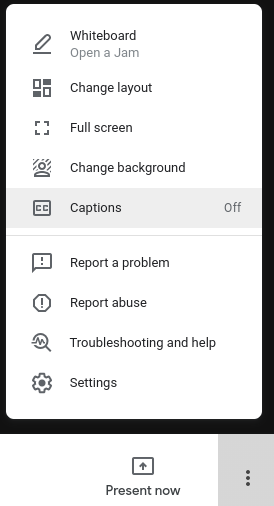
If you’re a fan of all things Google, and use Google Meet for video calls, you can switch on subtitles within a call by clicking the three vertical dots in the bottom right corner, and selecting ‘Captions’ from the menu that pops up:
At the time of writing, Zoom are in the process of adding this feature to Zoom video calls, and there are also ways to use the ‘live caption’ settings in a Chrome internet browser to add subtitles to any audio that comes through a Chrome web page. Newer Android and Apple smartphones also have a ‘live caption’ function that you can find under ‘Accessibility’ in the general settings menu for your phone. This is great for normal phone calls as well as video calls, and loads of other things that you’d want to add subtitles to, such as podcasts and radio shows. At the moment it’s limited to the English language, and it doesn’t work for absolutely everything.
If you’d like more help with using subtitles on your computer or phone, let us know and we can try and give you specific advice, or cover the different platforms in a future post. In the meantime, happy Skype-ing! 🙂 Robin (feat. Mike).